In this post, we will discuss precisely on WinRM and the steps involved in configuring winRM in azure virtual machine.

What is WinRM [Window Remote Management] ?
Window remote management or in short WinRM is built-in windows protocol/Service which uses soap[simple object access protocol] to connect from another source system. Using WinRM, we can connect the remote system and execute any command there as its native user.
WinRM comes pre-installed with all new window OS. We need to enable WinRM service and configure the ports for outside traffic.
Use case of using winrm :
The use-case where WinRM actually fits is that when we need to connect the remote machine and update the windows programs such as installing and uninstalling programs using Powershell script etc.
So, the first step for the above use case is to make a connection to the Remote Server.
In this post, we will discuss the steps for Configuring winRM in azure virtual machine or any remote machine[Non- azure VM] and establishing the connection.
Let’s start below steps to achieve the remote connection :
Steps for configuring WinRM
1. Create azure VM
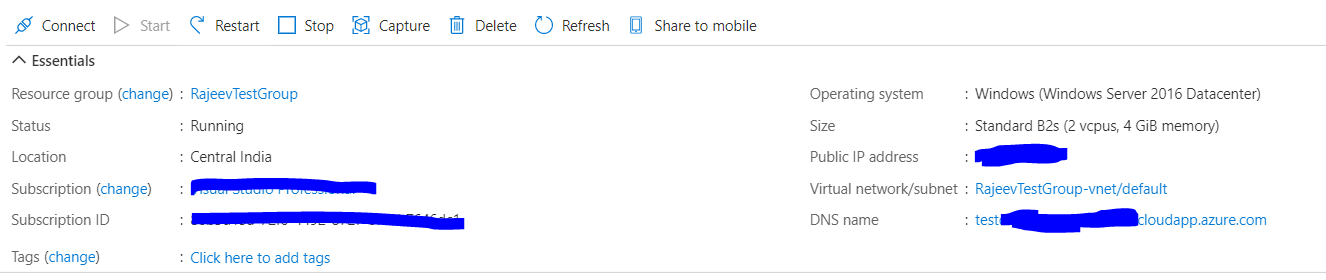
Create a azure virtual machine in your subscription in azure portal. I have used bare minimum hardware configuration VM for this demo. Select inbound port of RDP, HTTP and HTTPS.
Once azure VM is created, You can configure DNS name for this VM. This DNS name will be required for creating the certificate. For azure VM, DNS name will be used as HOST_NAME.
I have configured DNS name as ‘testdemovm’ with static ip here.
2. Verify the WinRM is installed and service running on the azure VM
WinRM comes already installed in all supported version of the Windows OS.
WinRM service automatically starts on all Windows Server 2008 and onwards. In old Windows OS such as Vista, you need to start it manually.
Login to the VM using RDP and verify whether the WinRM service is running or not.
Run-> write Service.msc -> chech the service

3. Quick configuration.
No WinRM listener is configured by default. Even if the WinRM service is running, the WS-Management protocol ensures that request data can’t be received nor sent.
We can enable the WS-Management protocol on the virtual machine/local system, and can set up the default configuration for remote management with the below command :
[Recommended] Powershell : Enable-PSRemoting -force
OR
winrm quickconfig
above command does the following:
- Starts WinRM service(if not started) and sets startup mode to auto-start.
- Configures a listener for the ports that send & receive WS-Management protocol messages using either HTTP or HTTPS on any IP address.
- Defines ICF exceptions for the WinRM service, and opens the ports for HTTP and HTTPS.
4. Add firewall profile with a remote connection to public network:
This step is very crucial and I felt blocker for some time until I figured it out. By default, for azure VM, public firewall rules allow only traffic from its own subnet. So, firewall rules should be updated to support public traffic i.e need to change local subnet to any.
Below command will create new rules for allowing outside traffic.
for HTTP :
netsh advfirewall firewall add rule name=”WinRM-HTTP” dir=in localport=5985 protocol=TCP action=allow
for HTTPS:
netsh advfirewall firewall add rule name=”WinRM-HTTPS” dir=in localport=5986 protocol=TCP action=allow
5. Verify default listener :
When you run winrm quickconfig command, It configures WinRM for HTTP connection [port 5985].
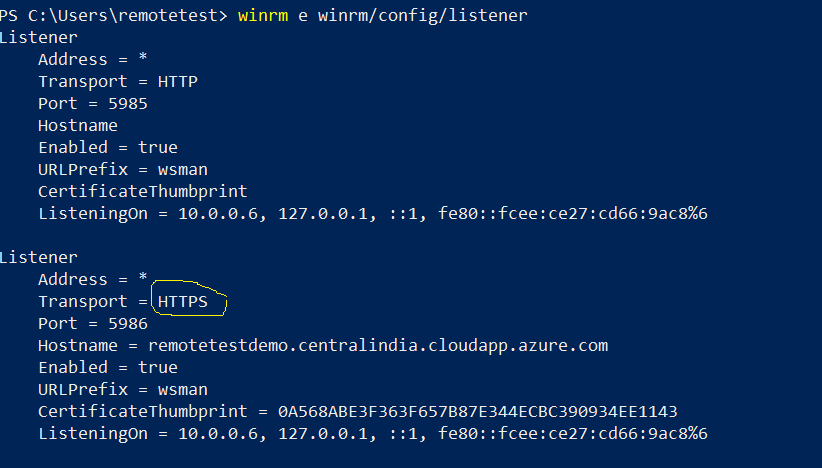
We can check the available listeners using below command :
winrm e winrm/config/listener

Here, as we can see the output, its configured to HTTP. So we need to add listener for the HTTPS in later steps.
6. Add Self-Signed Certificate.
Before adding Listener for the HTTPS, we need to add the self-signed certificate and get its thumbprint. The thumbprint of the certificate will be used to register the Listener in WinRM.
We can create a self-signed certificate either using makecert command or a New-SelfSignedCertificate PowerShell commandlet. I have used here Powershell command.- Open Powershell in administrator mode.- Write this command :
$cert = New-SelfSignedCertificate -DnsName “<DNS or IP>” -CertStoreLocation cert:\LocalMachine\My
Here, DNS: We should DNS name of your virtual machine. You can find DNS name in the overview page of the virtual machine. refer step 1-image for the DNS name.
This command will generate a self-signed certificate. We can keep the thumbprint of the certificate from the response. As thumbprint will be needed for the adding HTTPS listener.
7. Add HTTPS Listener with the certificate thumbprint.
Run the below command to add HTTPS listener for WinRM :
winrm create winrm/config/Listener?Address=*+Transport=HTTPS “@{Hostname=`”<DNS_Name or IP>`”;CertificateThumbprint=`”$($cert.ThumbPrint)`”}”
Here, Host name: DNS name for the VM.
Certificate_Thumbprint: the thumbprint for the newly created certificate in previous step.
8. Validate HTTPS Listener.
We can validate the listener for WinRM after adding the HTTPS listener. We can see 2 listener as a new https listener has been added.
9. Add Firewall exception rule for HTTPS.
Add a new In-bound firewall rule using the below command for the port 5986. You can skip if you already added HTTPS firewall rule in the previous step-4.
netsh advfirewall firewall add rule name=”WinRM-HTTPS” dir=in localport=5986 protocol=TCP action=allow
10. Add Inbound rule for port 5986 and 5985 in azure portal.
Finally, we need to add Inbound rule for the HTTP and HTTPS port in the Azure portal for the virtual machine. The virtual machine has its own port defined for HTTP and https – 5985 and 5986 respectively.

11. Verify HTTPS connection from source machine and execute command to remote maching.
We can now test the connection from the source machine.
– Create PSSession to remote VM:
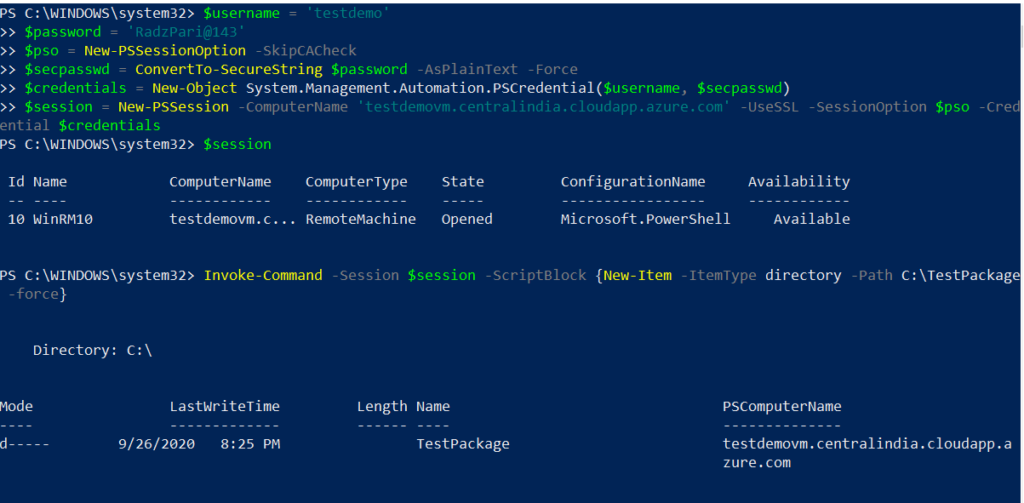
Below PowerShell script can be used for creating the session between source machine to AzureVM. Once the session is created, we can execute a command using the session obj.
$username = ‘<UserName>‘
$password = ‘<Password>‘
$pso = New-PSSessionOption -SkipCACheck
$secpasswd = ConvertTo-SecureString $password -AsPlainText -Force
$credentials = New-Object System.Management.Automation.PSCredential($username, $secpasswd)
$session = New-PSSession -ComputerName ‘<Your_DNS>‘ -UseSSL -SessionOption $pso -Credential $credentials
– Execute command with the session object :
Here, creating a folder TestPackage in the remote machine.
Invoke-Command -Session $session -ScriptBlock {New-Item -ItemType directory -Path C:\TestPackage -force}
Conclusion :
This article will help to Configuring winRM in azure virtual machine and verify the connection. In next, article we will see the ways for implement remote installation using azure DevOps or azure pipeline. How to run powershell command on remote computer using azure release pipeline .